VTK Adjust Transfer Functions for Volume Rendering
Table of Contents
When it comes to rendering medical images in 3D volume using either the Cornerstone library or the VTK library directly, mastering the widely-used WW/WL tool becomes essential. This tool equips radiologists with the precision to adjust visualization focus within a specific window, thereby enhancing diagnostic capabilities.
Rendering volumes in VTK involves manipulating various properties, offering users the necessary control for nuanced visualization. These properties include:
- Color Transfer Function
- Scalar Opacity
- Gradient Opacity
- Interpolation
- Shade
- Ambient
- Diffuse
- Specular
- Specular Power
While each property contributes to the rendering outcome, for the purpose of this discussion, the focus will be primarily on the trifecta essential for volume adjustment: color transfer function, scalar opacity, and gradient opacity.
Understanding Color Transfer Function and Scalar Opacity
The color transfer function maps scalar values, typically representing tissue density or other physical properties, to colors for visualization purposes. Simultaneously, scalar opacity controls the transparency of these scalar values.
Consider the following example values:
-3024 ➔ 0 0 0
-16.4458 ➔ 0.729412 0.254902 0.301961
641.385 ➔ 0.905882 0.815686 0.552941
3071 ➔ 1 1 1
In this representation, the first sRGB point dictates the color from voxel values -3024 to -16.4458, colored with black (0 0 0), while scalar opacity values dictate visibility:
-3024 ➔ 0
-16.4458 ➔ 0
641.385 ➔ 0.715686
3071 ➔ 0.705882
These values encapsulate a function for a range of points, defining both color and opacity. The first range, -3024 to -16.4458, will be hidden because the opacity is 0.
In Cornerstone, achieving this is facilitated by the applyPreset function, as demonstrated below:
const preset = {
	name: 'CT-Bone',
	gradientOpacity: '4 0 1 255 1',
	specularPower: '10',
	scalarOpacity: '8 -3024 0 -16.4458 0 641.385 0.715686 3071 0.705882',
	specular: '0.2',
	shade: '1',
	ambient: '0.1',
	colorTransfer:
	'16 -3024 0 0 0 -16.4458 0.729412 0.254902 0.301961 641.385 0.905882 0.815686 0.552941 3071 1 1 1',
	diffuse: '0.9',
	interpolation: '1',
}

utilities.applyPreset(
    volumeActor.actor,
    preset
);
Similarly, in VTK, achieving this functionality can be accomplished with the following code:
import vtkColorTransferFunction from '@kitware/vtk.js/Rendering/Core/ColorTransferFunction';

// Create a color transfer function
const colorTransferFunction = vtkColorTransferFunction.newInstance();
colorTransferFunction.addRGBPoint(-3024, 0.0, 0.0, 0.0);
colorTransferFunction.addRGBPoint(-16.4458, 0.729412, 0.254902, 0.301961);
colorTransferFunction.addRGBPoint(641.385, 0.905882, 0.815686, 0.552941);
colorTransferFunction.addRGBPoint(3071, 1.0, 1.0, 1.0);

// Apply the color transfer function to the volume property
const volumeProperty = vtk.VolumeProperty.newInstance();
volumeProperty.setRGBTransferFunction(0, colorTransferFunction);
By manipulating these presets, users can finely adjust rendering parameters to suit their visualization needs. For instance, altering the color and opacity values can significantly impact the visualization outcome, as depicted in the images below:
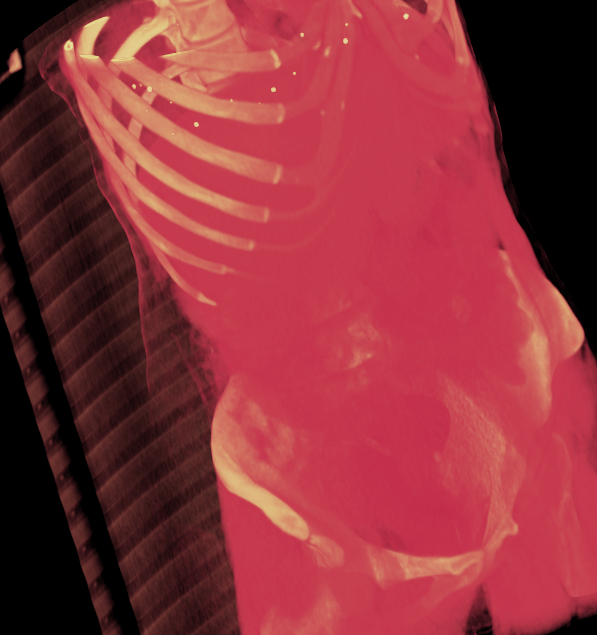
Upon adjusting parameters like point values and opacity, the visualization adapts accordingly, as illustrated below:
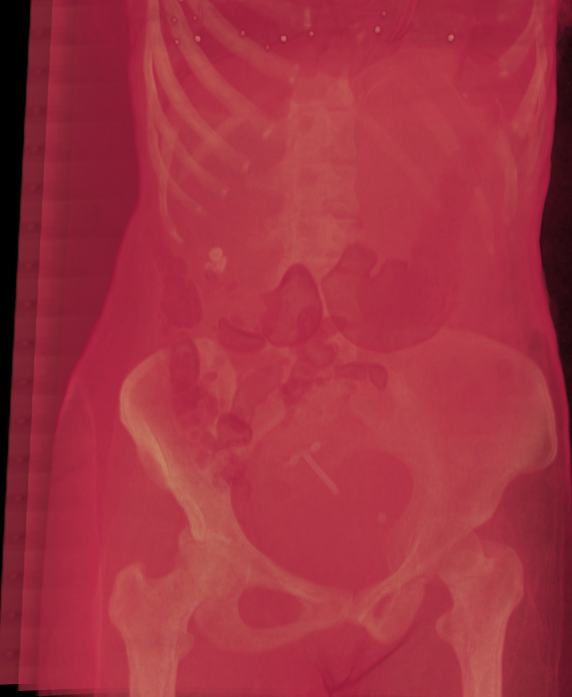
Point -16.4458 changed to -160.4458 and its opacity from 0 to 1, allowing soft tissues to appear after reducing the overall gradient opacity.
Understanding Gradient Opacity in Detail
Gradient opacity is a powerful feature that controls the visibility of boundaries between different tissues or structures in volumetric data. Unlike scalar opacity which simply determines how transparent each voxel is based on its value, gradient opacity considers the rate of change (gradient magnitude) between neighboring voxels.
When gradient opacity is applied:
- Regions with high gradient magnitude (sharp transitions) become more visible
- Areas with low gradient magnitude (homogeneous regions) become more transparent
This effectively enhances edges and boundaries while reducing visual clutter from homogeneous regions, making it particularly valuable for medical imaging where identifying anatomical boundaries is crucial.
Implementing Gradient Opacity in VTK
The code below demonstrates how to implement gradient opacity in VTK with fine-grained control:
const opacity = 1; // Overall opacity factor (0-1)

// Get the data range from the volume
const n = this.actor.getMapper().getInputData(),
    r = (n.getPointData().getScalars() || n.getPointData().getArrays()[0]).getRange();

// Calculate opacity scale factor with a non-linear mapping
const o = Math.max(0, opacity - 0.3) / 0.7;

// Enable gradient opacity for the first component (channel 0)
this.actor.getProperty().setUseGradientOpacity(0, true);

// Set minimum gradient value and corresponding opacity
// This controls how transparent low-gradient areas will be
this.actor.getProperty().setGradientOpacityMinimumValue(0, 2 * (r[1] - r[0]) * o * o);
this.actor.getProperty().setGradientOpacityMinimumOpacity(0, opacity);

// Set maximum gradient value
// This adjusts sensitivity to high-gradient regions
this.actor.getProperty().setGradientOpacityMaximumValue(0, 1 * (r[1] - r[0]));
Let’s break down these parameters:
setUseGradientOpacity(0, true)- Enables gradient opacity for the first componentsetGradientOpacityMinimumValue(0, value)- Sets the gradient magnitude below which voxels will have minimum opacitysetGradientOpacityMinimumOpacity(0, opacity)- Sets the opacity for voxels with gradient magnitudes at or below the minimumsetGradientOpacityMaximumValue(0, value)- Sets the gradient magnitude above which voxels will have maximum opacity
The calculation 2 * (r[1] - r[0]) * o * o creates a data-adaptive threshold based on the data range and the user-specified opacity. This formula ensures that the threshold scales appropriately with different datasets that might have vastly different value ranges.
Visual Impact of Gradient Opacity Settings
The effect of gradient opacity is dramatically visible when using a preset like CT-Soft-Tissue. Below are three visualizations with different gradient opacity values:
With 100% gradient opacity - boundaries are sharply defined:
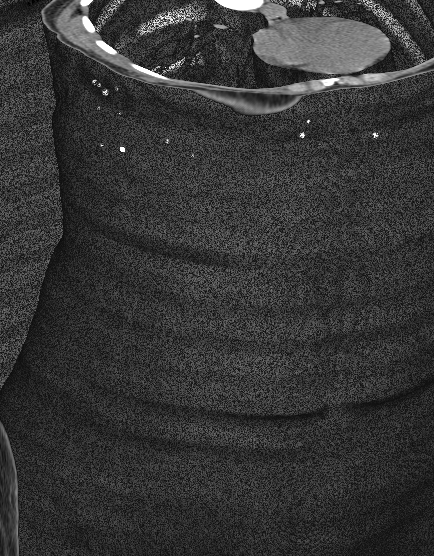
With 50% gradient opacity - moderate boundary enhancement:
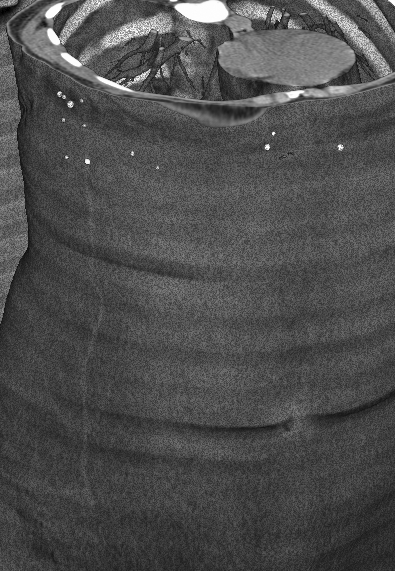
With 0% gradient opacity - no boundary enhancement, all tissues appear based solely on scalar opacity:
Notice how the internal structures become increasingly visible as gradient opacity decreases, while boundary definition becomes less pronounced.
Advanced Technique: Dynamic Gradient Opacity Adjustment
For interactive exploration, implementing a dynamic gradient opacity adjustment can significantly enhance the user experience:
function updateGradientOpacity(sliderValue) {
    // sliderValue ranges from 0 to 100
    const normalizedValue = sliderValue / 100;

    // Get data range
    const dataRange = volumeMapper.getInputData().getPointData().getScalars().getRange();
    const range = dataRange[1] - dataRange[0];

    // Apply non-linear scaling for better control
    const scaledValue = Math.pow(normalizedValue, 1.5);

    // Update gradient opacity settings
    volumeProperty.setGradientOpacityMinimumValue(0, range * 0.1 * (1 - scaledValue));
    volumeProperty.setGradientOpacityMaximumValue(0, range * (0.5 + normalizedValue * 0.5));

    // Trigger rendering update
    renderWindow.render();
}
Creating an Intuitive User Interface for Transfer Function Manipulation
Considering the complexity of adjusting transfer functions and opacity in volume rendering, there’s a significant opportunity to create more intuitive tools for medical professionals. An ideal interface would provide:
- Real-time Visual Feedback: Interactive adjustment with immediate visual updates
- Preset Management: Ability to save and recall custom presets for different clinical scenarios
- Context-Aware Defaults: Smart starting points based on imaging modality and anatomy
- Guided Adjustment: Simplified controls that abstract the underlying complexity
- Comparative Views: Side-by-side visualization with different transfer function settings
By implementing such tools, we can bridge the gap between the technical capabilities of volume rendering libraries and the practical needs of medical professionals. This would not only enhance diagnostic capabilities but also improve workflow efficiency in clinical settings.
Future Directions
As volumetric imaging continues to advance, we can expect further innovations in transfer function manipulation:
- AI-assisted parameter selection: Machine learning models that suggest optimal transfer function settings based on the imaging data and diagnostic task
- Natural user interfaces: Gesture and voice control for more intuitive interaction with volume renderings
- Perceptually optimized transfer functions: Functions designed based on human visual perception research to highlight clinically relevant features
By continuing to improve both the technical capabilities and usability of volume rendering tools, we can empower medical professionals to extract maximum diagnostic value from volumetric imaging data.
Comments
Comments are powered by utteranc.es and GitHub issues. You'll need a GitHub account to comment.